Rockarmor

MV Triton Bullbar - Rockarmor GT

sku: BBRA-MVGT

price: $2,800.00
sale price: $2,200.00
What's Included:
  • ▪️ 1 x Rockarmor GT Bull Bar
  • ▪️ Camera Re-location kit
  • ▪️ Tech Pack Relocation Kit
  • ▪️ Rated Recovery Points
  • ▪️ Mounting Cradle
  • ▪️ Bolts, Nuts & Washers Fitting Kit
  • ▪️ LED Fog Lights & indicators
  • ▪️ Bull Bar Skid Plates
  • ▪️ Centre Silver Bash Plate
  • 👉 Fitting Instructions can be downloaded from this page
We offer a variety of shipping options, including Depot Collection and delivery to business or residential addresses. Please proceed to checkout to receive a shipping quote.

CHECK OUT THESE ALTERNATIVE DEALS

description

delivery

Fitting Instruction

review

description

BULLBAR

MV TRITON BULLBAR

ROCKARMOR GT BULL BAR

Introducing the Rockarmor GT Bull Bar for the Mitsubishi MV Triton— an aggressive look that perfectly complements the Triton's new bold styling. This GT Bull Bar is designed to enhance the vehicle's protection as well as approach angles with its high-clearance design, making off-road adventures smoother.

The newly redesigned square centre hoop joins the signature GT wide hoops, offering superior frontal protection for your Triton. It features rated recovery points, winch access, antenna mounts, and high lift jack compatibility, all while maintaining full functionality with the Mitsubishi's factory safety systems.

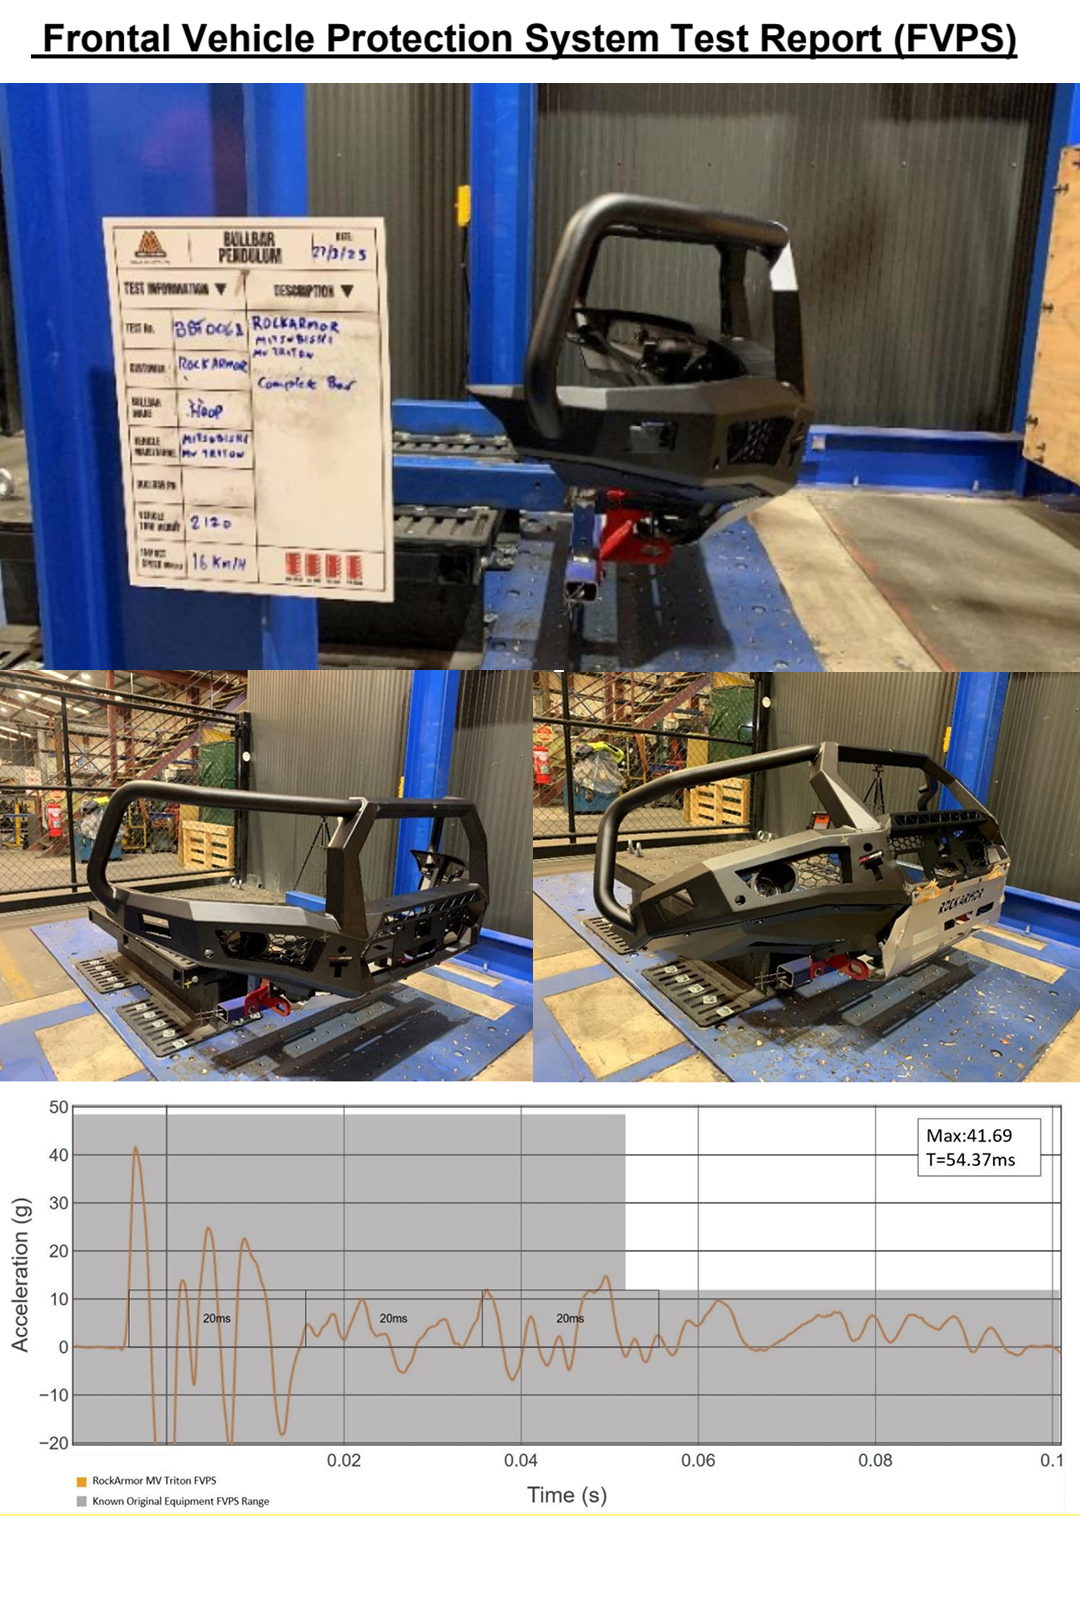
The Rockarmor MV Triton Bullbar has been built tough for serious 4WD enthusiasts!

MV TRITON GT BULL BAR SPECS

BRAND

ROCKARMOR

SUITS

MV TRITON

BULL BAR WEIGHT

70KG INCLUDES THE WEIGHT OF THE MOUNTING CRADLE

WINCH COMPATIBLE

YES (UP TO 12,000LBS)

FITMENT TYPE

BUMPER CUT REQUIRED

PARKING SENSOR & COMPATIBLE

YES

CAMERA COMPATIBLE

YES (RELOCATION KIT SUPPLIED)

DRIVER ASSIST RADAR COMPATIBLE

YES

LED LIGHTS

LED FOG LIGHT INCLUDED IN THE BULL BAR

INTERNAL LIGHT BAR OPTION

YES (LED LIGHT BAR NOT INCLUDED)

RATED RECOVERY POINTS

INCLUDED WITH THE BULL BAR

FRONT BASH PLATE

INCLUDED WITHT THE BULL BAR

AIR BAG COMPATIBLE

YES

ADR APPROVED

YES

EXTERNAL DRIVING LIGHT MOUNTS

YES (STORE UP TO 2 X 9" LED DRIVING LIGHTS)

ANTENNA MOUNTS

YES INCLUDED ON TOP HOOP

& OEM Safety Compatible

Australian Smash Tested & OEM Safety Compatible

The Rockarmor GT Bull Bar for the MV Triton isn't just built tough—it’s engineered with safety at the core. To ensure the highest safety standards, Rockarmor carries out frontal crash testing in accredited Australian smash testing facilities. This rigorous testing guarantees that our bull bar meets all required safety protocols for modern vehicles.

In these tests, the maximum deceleration of the Frontal Vehicle Protection System (FVPS) during the initial impact stayed within the limits of known OEM systems. More impressively, the deceleration reduced to below OEM benchmarks within the observed timeframe—demonstrating Rockarmor’s commitment to designing not only durable but safe frontal protection.

The GT Bull Bar has been engineered to work in harmony with your Triton’s OEM safety features, including airbags, sensors, and radar systems, giving you peace of mind on and off the road.

RATED RECOVERY POINTS

BUILT-IN RATED RECOVERY POINTS

SOFT SHACKLE FRIENDLY CHASSIS MOUNTED RATED RECOVERY POINTS

Recovering is a natural part of offroad 4-wheel driving. The Rockarmor GT Bull Bar, comes equipped with dual rated recovery points that have been engineered to effectively assist you in challenging situations. Coated in a vibrant red for quick recognition, these points come in pairs to facilitate the use of an equalization strap and offer various attachment options during recovery operations.

Protection

Built-In Under Bull Bar Protection

Designed to provide protection as well as More Air flow

The Rockarmor GT Bull Bar comes equipped with a built-in underbody protection plate, crafted from 3mm heavy-duty steel to shield your vehicle's vital components from rocks, debris, and off-road impacts.

Finished in a sleek silver powder coat, the integrated skid plate doesn’t just add tough protection, it enhances the overall look of your Triton with a clean, aggressive finish. Engineered for performance, the plate also includes laser-cut air vents, designed to maximise airflow to essential engine components, helping maintain optimal operating temperatures during demanding off-road conditions.

& EXTERNAL DRIVING LIGHT MOUNTING OPTIONS

INTERNAL LIGHT BAR & EXTERNAL DRIVING LIGHT MOUNTING OPTIONS

LIGHT UP THE PATH AHEAD!

The Rockarmor GT Bull Bar has been expertly engineered to accommodate a wide range of lighting setups, giving you the flexibility to enhance your night-time visibility whether you’re navigating remote tracks or tackling early morning job sites.

Up top, the bull bar includes pre-drilled mounting points, allowing you to install up to two 9-inch round external driving lights. These are ideal for long-range illumination, helping you light up the road or trail far ahead.

Additionally, the GT Bull Bar features an integrated internal mounting slot specifically designed to house a slimline LED light bar up to 26 inches in length. This recessed section not only protects your light bar from potential damage but also adds a clean, seamless look to your vehicle’s front end.

Whether you're fitting high-powered spotlights or a wide-beam LED light bar, the Rockarmor GT Bull Bar gives you the flexibility and durability to customise your lighting setup exactly how you want it—all while maintaining a tough and stylish appearance.

MV TRITON GT BULLBAR VIDEO

delivery

  • SHIPPING POLICY

    • Shipping costs displayed at checkout are estimates only. If the actual shipping charge at fulfillment exceeds this estimate, we’ll contact you to collect the difference.

    • Shipping is available within Australia only. No international delivery.
    • If all items in your order are in stock, they will be dispatched witthin 2-3 busniess days.

    • We Don't ship to P.O. boxes.

    • Delivery times vary based on location. Please allow 2-14 business days for delivery.

    • Click & Collect is available at no additional charge from our Sydney and Brisbane warehouses.

    • Shipping Damage: Unless you opt for delivery insurance, we are not responsible for any damage caused during shipping.

    • Failed Delivery/Pickup

      If an item is returned to us due to a failed delivery attempt or because the customer did not collect it from AusPost or the depot, the customer will be responsible for covering the shipping cost for re-delivery.

      Re-Delivery or Redirect Shipment

      If your shipment requires re-delivery due to a failed delivery attempt or needs to be redirected to a different address after dispatch, additional shipping charges will apply.

      New Charges: Any re-delivery or redirection will incur extra fees, which must be paid before the shipment is rescheduled. Charges vary based on the courier and location.

      To avoid delays or extra costs, please ensure the correct address is provided at checkout and someone is available to receive the delivery.

      Refund Requests: If the customer chooses to cancel the order instead of re-delivery, the original shipping charges will not be refunded. Only the product cost will be eligible for a refund.

      Please ensure accurate delivery details and timely collection to avoid additional charges. 


    RETURNS & WARRANTY POLICY

    • Professional installation is recommended. We are not responsible for any damage caused during installation and will not issue refunds for such cases.
    • Return Authorization: Before returning or exchanging an item, you must contact us with the item ID and reason for return/exchange.
    • Inspection on Arrival: Please inspect your order for any manufacturer defects or shipping damage upon arrival. Contact us immediately if there is an issue.
    • Change of Mind Returns: We accept change of mind returns, but a 20% restocking and admin fee will be deducted from the refund.
    • Return Deadline: Items must be returned within 15 days of delivery.
    • Late Returns: Returns will not be accepted if you contact us after 15 days from the date of delivery.
    • Minor scratches are not considered manufacturing defects.
    • Return Location: All returns must be sent to our Sydney or Brisbane warehouse.
    • Refund Process: Refunds will only be processed after we have received and inspected the item also to the same payment method you paid with.
    • Complete Returns: Items must be returned with all accessories. If any accessories are missing or damaged during return shipping, we will deduct the cost from the refund.
    • The warranty will be voided if any products are modified to fit, including cutting, grinding, shaving, screwing, or any other alterations, unless prior written or emailed approval has been obtained from Rockarmor head office

    Warranty Claims & Shipping Responsibility

    To start a claim, contact us at support@aussieoffroad.com.au.

    • If your Claim has been approved you must:

      1. Pay for shipping to send the item back to us.
      2. Pay for shipping when we send the replacement or repaired item back to you.

    LAY-BY POLICY

    • Aussie Offroad offers a 3-month lay-by on all products.
    • The item must be paid in full and picked up within 3 months from the purchase date.
    • If the 3-month period is exceeded, you still have the option to pay off the invoice and collect the item.
    • Lay-by cancellations: If you choose to cancel your lay-by, all payments made will be non-refundable.

Fitting Instruction

review

Customer Reviews

Be the first to write a review
0%
(0)
0%
(0)
0%
(0)
0%
(0)
0%
(0)